
When we’re first learning Cocoa (or Java, or Qt, or any other application framework), one of the early things we address is the Model-View-Controller design pattern. The Model-View-Controller (mvc) design pattern prescribes that a well-designed application will separate data-specific code (the model layer) from user-interface-specific code (the view layer), and that the two layers will communicate with each other by way of the controller layer.
From its inception, Cocoa has provided excellent support for model and view layer objects. Foundation classes such as NSMutableString, NSDictionary, and NSNumber provide firm footing for model classes, while AppKit’s NSView and its myriad subclasses provide a solid implementation of view layer classes. When it comes to making these two domains talk to each other, however, it has always been the responsibility of the developer to write the glue code for the controller layer. And let’s face it: if you’ve developed any application of moderate complexity, you know that writing this glue code can be downright tedious.
Apple recognized this problem and set out to provide a solution that was made available in Mac OS X 10.3. Their solution is the Controller Layer, which is comprised of a number of classes and protocols that implement a cohesive architecture for facilitating communication between an application’s model and view layers.
The controller layer is the confluence of several new and existing Cocoa technologies including key-value coding, key-value observing, and key-value binding. By Apple’s reckoning, the controller layer potentially allows 90 percent of Cocoa applications to replace custom-developed glue code with the components of the controller layer. In the grand tradition of Cocoa, making use of the controller layer is done almost entirely in Interface Builder, thus minimizing the amount of code you need to write. The benefit for us is clear: We can cut down or eliminate altogether the countless hours we spend implementing and maintaining the code that connects our data models to the outlet’s and actions for each and every one of our user-interface controls.
The controller layer is made up of a number of classes and protocols. The core controller classes defined in the AppKit are:
NSController is an abstract base class that defines the general interface for all controller classes. NSObjectController is a simple concrete subclass of NSController that allows user-interface objects to be bound to a single object, while NSArrayController—itself a subclass of NSObjectController—manages a collection of objects. NSUserDefaultsController is another concrete subclass of NSController that provides an interface between the user-defaults database, and properties and values of controls in your user interface.
So what exactly do these controllers do? In short, they connect properties of model objects to user-interface elements that can display and manipulate the values of the associated properties. Consider for a moment, that our data model is a class that represents a book. Some of the properties of this model are the book title and author, which may be stored as NSString instance variables of the class Book.
Using an NSObjectController, we could associate an NSTextField to each of these properties, and the mechanisms implemented in the controller layer take care of displaying the value of the property, storing changes made in the text fields to the data model, and notifying other interested interface elements of any changes to the data. Using an NSArrayController, we can manage a collection of Book objects, and display that collection in an NSTableView, which is exactly what we will be doing today in this article. All we have to do is establish the association in Interface Builder between view, controller, and model.
Before we get into our application for the day, let’s focus more on the mechanisms that form the basis of the controller layer. The mechanisms referred to here are Key-Value Coding, which a Foundation protocol, and Key-Value Observing, which is implemented in a number of new NSObject methods. The controller layer brings these two mechanisms together into Key-Value Binding, which forms the fundamental fabric of the controller layer.
Key-Value Coding (kvc) is one of the core Cocoa technologies that has existed for some time. The goal of kvc is to provide a mechanism to indirectly access an object’s property values (i.e. instance variables) by name through the use of key strings, rather than by directly invoking accessor methods. The methods used to access object properties are defined in the foundation protocol NSKeyValueCoding.
As an example of how to use kvc, consider our Book class, which might have the following simple class interface:
 @interface Book : NSObject {
     NSString *_title;
     NSString *_author;
 }
 - (NSString *)title;
 - (NSString *)author;

 - (void)setTitle:(NSString *)title;
 - (void)setAuthor:(NSString *)author;
 @end
We see that the book class has two NSString instance variables, title and author, along with accessor methods for setting and getting the values of those instance variables. Ordinarily we would access these properties by their respective accessor methods. If we wanted to set the title of the book object, we would do the following:
[aBook setTitle:@"The Illiad"];
Retrieving the title of the book involves a simple invocation of title:
NSString *title = [aBook title];
Now, with kvc we use key strings to set and retrieve property values using the methods valueForKey: and setValue:forKey:, as follows:
 [aBook setValue:@"The Illiad" forKey:@"title"];

 NSString *title = [aBook valueForKey:@"title"];
There are a number of rules that kvc follows for identifying the accessor method or instance variable to which a given key refers. In the case of [aBook valueForKey:@"title"] kvc will first look for public accessor method named setTitle:, and if that is not found a private accessor named _setTitle:.
If neither a public or private accessor method can be found, kvc will attempt to directly change the value of an instance variable named title or _title. kvc prefers to use accessor methods to set and retrieve property values, but will access instance variables directly if no accessor methods are implemented. It is generally recommended that you always implement accessor methods to control access to your class’s instance variables. For a detailed discussion of Key-Value Coding, see Apple’s Introduction to Key-Value Coding.
Key-Value Observing (kvo) is new technology in Panther on which the controller layer relies heavily. What kvo provides is a mechanism that allows objects to be notified of changes to the properties of a specific object being observed. The controller technology relies on this kvo to facilitate communication between an application’s model, controller, and view layers. Thus, by using kvo a controller object will always be aware of changes made to its managed data object, and the user interface will always be updated to reflect any changes in the controller layer.
We won’t delve into the details of Key-Value Observing here today, as they won’t add too much to the discussion. The important thing to take away from this is that Cocoa now has in its root class, NSObject, the means of allowing objects to observe specific changes of state in other objects.
We have learned just now that Key-Value Coding permits objects to indirectly access the properties of other objects through the use of keys. We have also learned how Key-Value Observing provides a mechanism that allows objects to observe changes to properties of other specific objects. The controller layer fuses kvc and kvo to form the fundamental communication fabric of the controller layer operates, which is a design pattern called Key-Value Binding.
Key-Value Binding allows the properties of one object to be bound to the properties of another object. kvc provides the means for an object to determine and change the value of a property in another object, while kvo allows that first object to track changes to the state of the second object. The image below shows how bindings with kvc and kvo facilitate communication and synchronization in the mvc pattern:

In this figure we see how the combination of kvc and kvo creates a binding. Here, if the user were to make a change to the spreadsheet, that change would be pushed down to the data model, while kvo would notify the controller and the bar graph that a change has been made and the view needs to be updated to reflect that change.
Using bindings, we can bind the value displayed in a text field to the value of a property of a data object managed by a controller. Remember, in all of this the controller always acts as an intermediary. We never want to bind views directly to data models (nor are we able to do as much using the standard controller classes in Cocoa).
Our job in using the controller layer technology is to specify and establish these bindings between a controller and user interface objects. In Interface Builder we can view all of the available bindings for any user interface control in the object’s Bindings inspector (Command-4). First, we must define the data model for our particular application so that a controller knows what model properties are available for bindings.
Establishing a solid design for a data model is an essential first step to taking advantage of the controller layer technology. The application we’re going to build today is a simple book catalog, so we need to put together a Book class that will serve as our data model.
Before we get going, create a new Xcode project that is a Cocoa document-based application with whatever name you like (I called my Bibliotecha). Remember, the controller layer was released in Mac OS X 10.3, so you have to be running that or a later version of Mac OS X to follow along with this article.
The class Book will be a simple representation of a book consisting or properties such as book’s title and author. A more complete and accurate representation of a book might include properties for the publisher, isbn, publication date, and more. For simplicity’s sake we’ll stick with just a title and author. Create a new Objective-C class named Book, and define the following class interface in Book.h:
 @interface Book : NSObject {
     NSString *_title;
     NSString *_author;
 }
 - (NSString *)title;
 - (NSString *)author;

 - (void)setTitle:(NSString *)title;
 - (void)setAuthor:(NSString *)author;
 @end
Our Book data model class is quite simple: NSString instance variables are used to store the book’s title and author. We then have accessor methods to set and get the values of each of these instance variables. The implementation of these four methods is straightforward:
 @implementation Book

 - (NSString *)title { return _title; }
 - (NSString *)author { return _author; }

 - (void)setTitle:(NSString *)title
 {
     [_title autorelease];
     _title = [title retain];
 }

 - (void)setAuthor:(NSString *)author
 {
     [_author autorelease];
     _author = [author retain];
 }

 @end
For each of the “getter” methods, we simply return the value of the instance variable in question. In the setter methods we autorelease the existing value, and set the value of the instance variable to the new object after we have retained it. For a simple data model, this is all we have to do. A more complicated data model might have computed properties, or the properties may be more complex data types. For example, to more accurately represent the fact that many books have multiple authors, we might have the author property be an NSArray of Author objects with properties for first, middle, and last name.
We now have established a very simple, yet sufficient, data model for Bibliotecha. Now it’s time to switch gears and move into Interface Builder, where we will do most of the work to create our interface, and connect the interface to the data model through appropriate controller objects. So, double-click on the file MyDocument.nib to open it up in Interface Builder, and let’s get to work over there.
Our interface will be pretty sparse: just enough to demonstrate how the controller layer functions. It will consist of two windows. The first window consists of a table view of that lists all of the books in the catalog. In addition to the table view, there are three buttons for adding and removing records in the table, as well as for opening an inspector window. The second window is an inspector-like window that allows the user to edit detailed information about the currently selected book in the table view. In this setup, the table view window is known as the master view, as it shows all of the books stored in the catalog, and the inspector is called the detail view as it may potentially display more detailed information about a single record.
Our master view table has only two columns: one for the book title, and one for the author. The interface for the main window is shown here:
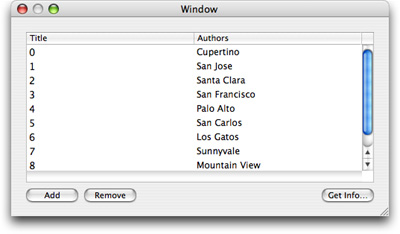
Here we have a table view to display the contents of our book catalog. The Add button will add a new row to the table, and the Remove button will remove the selected row. The Get Info… button is used to open up the inspector window that shows a detailed view of the selected record.
The inspector window is simple as well. It consists of nothing more than two text fields to display the values of the two properties of an instance of Book:
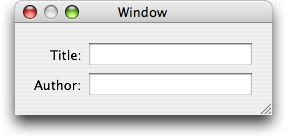
If the Book class had more properties than what we gave it, then we could have arranged things so that the table view shows a subset of the properties (i.e. the most important properties such as title and author), while the detail view inspector provided fields to display every property of our data model.
Now that we have our two windows setup, let’s move on to wiring up some controllers.
 Cocoa controller objects exist in their own Interface Builder palette, shown below:
These three objects represent the three controllers available in Cocoa. On the left we have an instance of NSUserDefaultsController, in the middle is an NSObjectController, and at the right is NSArrayController. Since we wish to use a controller to populate and manage the contents of an NSTableView we will grab an NSArrayController; drag out an instance of NSArrayController into your nib’s Instances window. We want to give it some unique name so that’s it easily identified when we need to use it. To do that double-click on the object label and change the name from NSArrayController to something like Book Controller.
Next, we need to tell the controller what kind of object it will be managing. An NSArrayController needs to know the data model class it will manage so it knows how to instantiate new objects. To do this, open the Attributes inspector, and change the Object Class Name from NSMutableDictionary to Book.
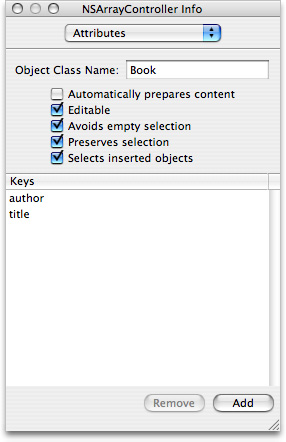 Now, we need to tell Book Controller what keys are available for accessing properties of Book objects. This is done in the Keys list in the same Attributes view of the inspector. The keys you enter here are the same keys one would use to access object properties using key-value coding: author and title. At this point your NSArrayController should be configured in the following way:
Now, a quick recap of what we just did: We have created an instance of NSArrayController in our nib and named it Book controller. This will be the controller that manages the contents of the master table view. The NSArrayController is configured to work with instances of the class Book, which we indicated in the Attributes inspector. We also defined the keys that the NSArrayController will use to access properties of each instance of Book managed by the array controller. These are the same keys that one would use in key-value coding to indirectly access the instance variables of Book objects. In short, we’ve now defined the link between the data model and controller layer of our application. Now we need to establish the bindings between the controller and the views.
Bindings between the controller and interface are established individually for each interface element. For our application, each table column is considered an element of the interface, so we must establish a binding between the Title table column and the title property of the model by way of the controller we created. We must also create a binding between the Author table column and the author property of Book.
For now, select the Title NSTableColumn (by whatever combination of clicking and double-clicking that is required to select such a deeply nested control), and open the Bindings inspector for the NSTableColumn. The Bindings inspector lists all of the attributes of the selected interface element that are available to be bound to an controller. The available bindings include properties such as font attributes and text color, as well as availability states such as whether or not the control is editable, enabled, or hidden. Most importantly for our purposes today, we have a binding for the value of the table column, which is what will be displayed in each row of the table column.
To reveal the options for the value binding, click on the disclosure triangle to the left. This exposes a plethora of options; focus only on the first three options. Here we have three parameters that are used to tell the NSTableColumn where to get its data from. Bind to is where we specify what controller we will use to obtain the value from the data model. In this popup you should see Book Controller, which is the controller we want to select.
Next we have the parameter Controller Key. Just like any object, instances of NSArrayController have properties that are accessible via key-value coding. You’ll notice that each of the keys in the Controller Key list correspond to methods of NSArrayController. Here we want to choose arrangedObjects, which corresponds to the NSArrayController method that returns the NSArray of data model objects that is managed by the controller; in our case this will be an array of Book objects.
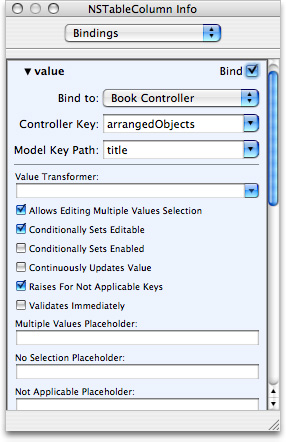 Finally, we want to specify the Model Key Path, which is simply the key used to access the property of the data model whose value we’re interested in displaying. Opening this combo box will reveal all of the keys we specified when we configured Book Controller. For the Title column values, we naturally would like to show the title of the book, so we select the title key for this parameter. With that, we have set up a complete binding between the data model, controller, and a user interface component. Creating the binding for the Author column is exactly the same, except we choose author for the Model Key Path rather than title. When you’ve configured the binding properly, the inspector should look like the following:
Let’s move our attention to the three buttons at the bottom of the main window. Again, the Add button is used to add a new record to the table view, the Remove button will delete the selected record in the table, and the Get Info… button will show a detailed view of the selected record. NSArrayController defines a number of methods that can be the action of a control. Two of these actions are add: and remove:. The add: action will tell the array controller to create a new instance of its data model class, and append it to the array of managed objects. The remove: action will remove the selected object from the array controller’s content array. What we want to do is drag a connection from the Add and Remove buttons to Book Controller and make their actions add: and remove:, respectively:
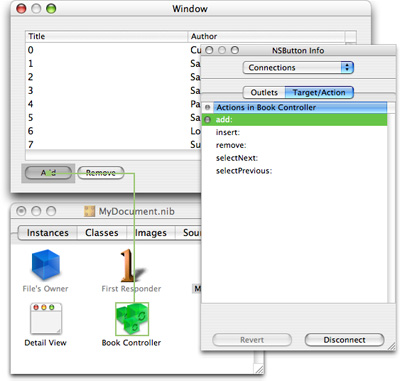 Notice that NSArrayController also has an action for inserting new items, as well as for changing the current selection to the next or previous object in the array. You could optionally create controls for these actions.
We are ready to test version 1 of our interface. Do this now in Interface Builder by selecting Test Interface from the File menu. The main window will appear, and you should be able to click the Add button to create a new row in the table, and edit the fields of that row. That, dear readers, is how the controller layer works in Cocoa. Pretty slick stuff if you ask me! If you’d like to see some more slick stuff, try entering in several rows of information, and then click on the table column headers. Sorting! Right out of the box without any work on your part!
Let’s get back into Interface Builder and set up the bindings for the Inspector, and add a bit of refinement to the way things work.
The Get Info… button needs to be able to open up the inspector window. To do this we simply make the action of this button the makeKeyAndOrderFront: method of the inspector window.
Setting up bindings for the inspector text fields is very similar to what we did for the table columns. Select the title NSTextField, and open its Bindings inspector. Select the value section to disclose the value bindings options. Just like with the Title table column we select to bind the text field to Book Controller, and the Model Key Path is the title key for the Book class. The thing that differs is the Controller Key, which we set to selection. This controller key corresponds to the selection method of NSObjectController, which for NSArrayController returns the currently selected object in the content array. By setting the controller key to selection, the text field will always display the title property of the selected table row. Do the same for the Author text field, binding its value to the author property of the model class, and setting the controller key to selection.
When you test run the interface, you will see how the text fields of the inspector track the current selection. Note how the text fields display “No Selection” when there is no selection in the table view. This string is known as a placeholder, and the string that is displayed can be changed in the value binding inspector for the text field. There are four types of placeholders that you can customize: no selection, multiple values, not applicable, and null.
If you’ve setup the NSTableView to allow multiple selections, you’ll notice that the text fields show the string “Multiple Values” when you have more than one row selected (this is the default multiple values placehold). This is handled intelligently, however. Consider the scenario where we have selected two books in the table: The Odyssey and The Illiad, both by Homer. In the inspector the title field will show “Multiple Values”, however, the author field will show “Homer” since all of the selected rows have “Homer” as the author. The emphasis here really is to show when there are multiple values for a single property rather than when there are multiple records selected.
You’ve probably noticed by now that there are lots of control attributes that we can bind to a controller. One example is in NSWindow. If you open the Bindings inspector for the inspector window itself, one parameter we can bind to is the window’s title. Select title from the list of parameters, and let’s bind it to the selection key of Book Controller, and the title model key path. This is exactly what we did to set up the value binding of the title text field. Now the title of the inspector window will match the title of the book that is selected in the main table view. Once again, slick stuff!
Another point of refinement we might like to make is to have the Remove button enabled only when there is a selection made. This is easy to do using the controller bindings technology. In the Bindings inspector for the Remove button open up the parameters for the enabled binding under Availability. Choose to bind to the Book Controller, and under Controller Key select canRemove. This is one of the many keys that correspond to methods in NSArrayController that return Boolean values, suitable for use as keys to bind to Boolean properties of user-interface controls, such as whether the control is enabled. You could also set up the Add button enabled availability to be bound to the canAdd key of Book Controller.
With the addition of the controller layer, Cocoa goes even further in achieving the core goal of any application framework: eliminate as much repetitive coding as possible so that the developer can focus his energies on developing innovative and polished features that potentially sets his application apart from the rest of the pack. I hope this article has given you a glimpse of what can be done using the controller layer, as well as an idea of how things work in the background so you can explore other bindings options.
You can download the XCode Project for this article here.
Posted by cds at April 6, 2004 02:17 PM